
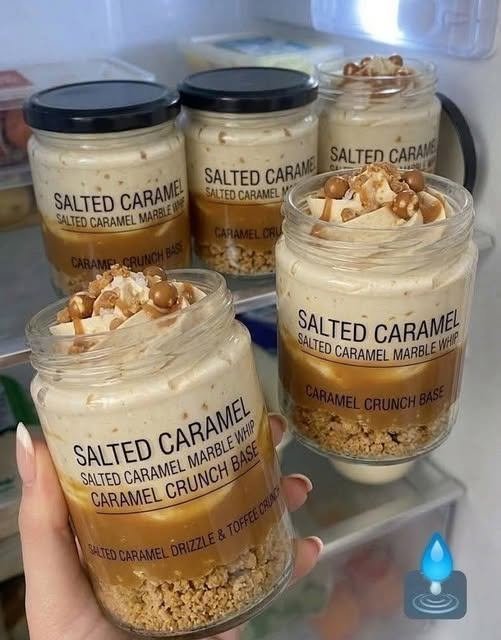
These No-Bake Salted Caramel Cheesecake Cups are creamy, rich, and incredibly easy to make. Each little dessert cup has a buttery cookie crust, smooth cheesecake filling, and plenty of homemade salted caramel on top. A sprinkle of flaky sea salt brings everything together and keeps the caramel flavor from becoming overly sweet.
The best part? There is no oven required. You simply prepare the crust, whip up the creamy cheesecake filling, layer everything into individual cups, and let the refrigerator do the work.
These cheesecake cups are perfect for dinner parties, holidays, birthdays, potlucks, or whenever you want an impressive dessert without spending hours in the kitchen.
Why You’ll Love These Cheesecake Cups
- No baking required
- Creamy and silky cheesecake texture
- Rich homemade salted caramel flavor
- Easy individual portions
- Great make-ahead dessert
- No gelatin needed
- Perfect for parties and special occasions
- Can be prepared several days ahead
Recipe Overview
Prep Time: 30 minutes
Cook Time: 10–15 minutes
Chill Time: 4–6 hours
Total Time: About 5 hours
Servings: 6 cheesecake cups
Course: Dessert
Cuisine: American
Method: No-Bake
Ingredients
For the Salted Caramel Sauce
- ¾ cup granulated sugar (150 g)
- 4 tablespoons unsalted butter (56 g), cut into pieces
- ⅓ cup heavy cream (80 ml), preferably room temperature
- 1 teaspoon vanilla extract
- ½ to ¾ teaspoon sea salt, or to taste
For the Cookie Crust
- 7 oz Biscoff cookies (about 200 g)
- 6 tablespoons unsalted butter (85 g), melted
You can also use graham crackers or digestive biscuits if preferred.
For the Cheesecake Filling
- 16 oz full-fat cream cheese (450 g), softened to room temperature
- ⅓ cup granulated sugar (65 g)
- 1 teaspoon vanilla extract
- ⅓ cup cooled salted caramel sauce
- ⅔ cup heavy whipping cream (160 ml), cold
For Topping
- Extra salted caramel sauce
- Flaky sea salt
- Whipped cream, optional
- Crushed Biscoff cookies, optional
Equipment You’ll Need
- Small heavy-bottomed saucepan
- Food processor
- Mixing bowls
- Electric hand mixer or stand mixer
- Rubber spatula
- 6 dessert cups or small jars
- Piping bag, optional
How to Make No-Bake Salted Caramel Cheesecake Cups
Step 1: Make the Salted Caramel
Add the granulated sugar to a clean, wide saucepan over low to medium-low heat.
Allow the sugar to slowly melt. As it melts, gently swirl the pan occasionally. Avoid stirring aggressively because this can encourage crystallization.
Continue cooking until the sugar becomes a smooth amber-colored caramel.
Remove the saucepan from the heat.
Slowly add the butter and whisk until completely incorporated.
Carefully pour in the heavy cream while whisking continuously. The caramel will bubble up strongly, so add the cream slowly and carefully.
Once smooth, stir in the vanilla extract and sea salt.
Taste the caramel once it has cooled slightly and add a little more salt if desired.
Transfer the caramel to a heatproof bowl and allow it to cool completely.
Important: The caramel used inside the cheesecake filling must be completely cool or only slightly warm. Hot caramel can soften the cream cheese mixture and make the filling loose.
Step 2: Prepare the Cookie Crust
Place the Biscoff cookies into a food processor and pulse until they become fine crumbs.
Add the melted butter and pulse again until the mixture resembles wet sand.
Divide the cookie mixture between six dessert cups.
Press the crumbs down firmly using the back of a spoon or the bottom of a small glass.
Place the cups in the refrigerator while you prepare the cheesecake filling.
Step 3: Make the Cheesecake Filling
Place the softened cream cheese, granulated sugar, and vanilla extract into a large mixing bowl.
Beat with an electric mixer for about 2–3 minutes, or until the mixture is completely smooth and creamy.
Add ⅓ cup of the cooled salted caramel sauce.
Mix just until the caramel is incorporated.
Do not overmix at this stage.
Step 4: Whip the Heavy Cream
Pour the cold heavy whipping cream into a separate chilled bowl.
Beat until medium peaks form. The cream should be thick enough to hold its shape but should still look smooth and creamy.
Add the whipped cream to the cream cheese mixture in two additions.
Using a rubber spatula, gently fold the whipped cream into the cheesecake mixture.
Fold carefully rather than vigorously stirring. This keeps the filling light, creamy, and fluffy.
Step 5: Assemble the Cheesecake Cups
Remove the chilled cookie crusts from the refrigerator.
Spoon or pipe the cheesecake filling over each crust.
Fill the cups evenly, leaving a little space at the top for the caramel topping.
Smooth the tops with the back of a spoon or a small offset spatula.
Cover the cups and refrigerate for at least 4–6 hours.
For the best texture, refrigerate them overnight.
Step 6: Add the Salted Caramel Topping
Once the cheesecake cups are fully chilled and set, prepare the remaining caramel sauce.
If the caramel has become too thick in the refrigerator, warm it gently for a few seconds until it becomes pourable.
Do not make it hot.
Drizzle a generous amount of caramel over each cheesecake cup.
Finish with a small pinch of flaky sea salt.
For an extra-pretty presentation, add a swirl of whipped cream and a few crushed cookie crumbs.
Tips for Perfect Cheesecake Cups
Use Full-Fat Cream Cheese
Full-fat cream cheese gives the filling a richer flavor and helps create a thicker, creamier texture.
Make Sure the Cream Is Cold
Cold heavy cream whips more easily and gives the cheesecake filling better structure.
Cool the Caramel Completely
This is one of the most important steps. Warm caramel can loosen the cream cheese mixture and make the cheesecake filling difficult to set.
Don’t Overmix
Once the whipped cream is added, gently fold everything together. Overmixing can remove the air from the whipped cream and make the filling heavy.
Give Them Enough Time to Chill
Although the cups may look set after a few hours, chilling them overnight gives you the best texture.
Don’t Overheat the Caramel
When reheating caramel for drizzling, use short bursts of heat. It only needs to become pourable.
Can I Use Store-Bought Caramel Sauce?
Absolutely.
If you want to save time, use a good-quality salted caramel sauce from the store. Let it cool before adding it to the cheesecake filling.
Homemade caramel gives the dessert a deeper flavor, but store-bought caramel works perfectly for a quick version.
Can I Use Graham Crackers Instead of Biscoff?
Yes. Graham crackers, digestive biscuits, shortbread cookies, or other crisp cookies can all work well.
If using a less-sweet cookie, you may want to slightly increase the sweetness of the cheesecake filling.
Can I Make These Cheesecake Cups Ahead of Time?
Yes. These are an excellent make-ahead dessert.
Prepare the crust and cheesecake filling, cover the cups, and refrigerate them for up to 3 days.
Add the caramel topping and whipped cream shortly before serving for the freshest presentation.
How to Store
Keep the cheesecake cups covered in the refrigerator.
They are best enjoyed cold and should not be left at room temperature for extended periods because the cream cheese and whipped cream filling can soften.
Can I Freeze Cheesecake Cups?
Yes, you can freeze the cheesecake portion.
Cover the cups tightly and freeze for up to about 1 month for the best quality.
Thaw them slowly in the refrigerator before serving.
For the best texture, add fresh caramel and whipped cream after thawing.
Variations
Chocolate Salted Caramel
Add a thin layer of melted chocolate between the cookie crust and cheesecake filling.
Apple Caramel
Add a spoonful of finely diced cinnamon apples over the crust before adding the cheesecake filling.
Chocolate Cookie Crust
Replace the Biscoff cookies with chocolate sandwich cookies for a chocolate-caramel combination.
Pecan Caramel
Top each cheesecake cup with finely chopped toasted pecans and flaky sea salt.
Extra Caramel
For serious caramel lovers, add a thin caramel layer between the crust and cheesecake filling as well as caramel on top.
Frequently Asked Questions
Can I make these without gelatin?
Yes. This recipe doesn’t require gelatin. The cheesecake gets its structure from the cream cheese, whipped cream, and proper chilling time.
Why is my cheesecake filling too soft?
The most common reasons are warm caramel, warm cream cheese, under-whipped cream, or not enough chilling time.
Make sure the caramel has cooled completely and the heavy cream is properly whipped before folding it into the filling.
How long should no-bake cheesecake cups chill?
Chill them for at least 4–6 hours. Overnight chilling is even better for a firmer cheesecake texture.
Can I use regular caramel instead of salted caramel?
Yes. You can use regular caramel sauce, but adding a small pinch of flaky sea salt at the end gives the dessert a much better sweet-and-salty balance.
What size cups should I use?
Small dessert glasses or approximately 6–7 oz cups work well for individual servings.
Can I make one large cheesecake instead?
Yes. The same basic filling can be used in a larger cheesecake dish or springform pan. You will need to allow additional chilling time and adjust the crust quantity depending on the pan size.
Nutrition Information
Approximate nutrition per serving:
Calories: 550 kcal
Carbohydrates: 50 g
Protein: 6 g
Fat: 38 g
Saturated Fat: 23 g
Sugar: 45 g
Sodium: 280 mg
Nutrition values will vary depending on the specific brands and ingredients used.
Final Thoughts
These No-Bake Salted Caramel Cheesecake Cups are proof that you don’t need an oven to make an impressive cheesecake dessert. The buttery cookie crust, creamy cheesecake filling, rich caramel, and little flakes of sea salt create the perfect combination of textures and flavors.
They’re easy enough for a casual family dessert but look elegant enough for parties and holidays. Make them the night before, keep them chilled, and add the final caramel drizzle just before serving.
One bite and you’ll understand why this easy no-bake dessert is so hard to resist!
