Sourdough Discard Pull-Apart Garlic Bread (Full Recipe)
There is something uniquely satisfying about pull-apart bread. It sits somewhere between a loaf of bread and a tray of garlic rolls, giving you layers of soft dough brushed with garlic butter that separate into warm, fluffy pieces. Adding sourdough discard makes it even better because it introduces depth of flavor without requiring a long sourdough fermentation schedule. Instead of throwing away discard from your starter, you turn it into something rich, aromatic, and ideal for sharing.
This recipe creates a soft and buttery pull-apart garlic bread with a tender crumb and layers of garlic herb butter tucked between every fold. The discard contributes a subtle tang that balances the richness of the butter and cheese. The loaf can be served with pasta, soups, salads, grilled foods, or simply enjoyed on its own while still warm from the oven.
Why Use Sourdough Discard?
Many bakers keep a sourdough starter and regularly remove a portion during feeding. That removed portion is called sourdough discard. While it can technically be discarded, it still contains flour, water, flavor compounds, and natural fermentation activity.
Sourdough discard works especially well in enriched breads because:
- It adds a mild tangy flavor.
- It improves moisture retention.
- It helps create a softer texture.
- It reduces food waste.
- It brings more complexity than standard dough recipes.
This recipe does not rely on discard alone for rising. Commercial yeast provides the primary lift, which makes the process reliable and beginner-friendly.
Yield
Makes 1 large pull-apart loaf
Serves approximately 8–10 people
Preparation time: 30 minutes
First rise: 60–90 minutes
Second rise: 30–45 minutes
Baking time: 35–40 minutes
Total time: Approximately 3 hours
Ingredients
For the Dough
- 120 g sourdough discard (unfed is fine)
- 240 ml warm milk
- 7 g instant yeast (1 packet or 2¼ teaspoons)
- 50 g granulated sugar
- 1 large egg
- 60 g unsalted butter, melted
- 420–480 g all-purpose flour
- 8 g salt (1½ teaspoons)
For the Garlic Butter Filling
- 115 g unsalted butter, softened
- 6–8 garlic cloves, finely minced
- 2 tablespoons chopped fresh parsley
- 1 tablespoon chopped fresh chives
- 1 teaspoon dried oregano
- ½ teaspoon salt
- ¼ teaspoon black pepper
Optional Cheese Filling
- 100–150 g shredded mozzarella
- 50 g grated parmesan
For Finishing
- Extra melted butter
- Additional chopped parsley
- Parmesan for sprinkling
Equipment Needed
- Large mixing bowl
- Measuring cups or kitchen scale
- Rolling pin
- Loaf pan (approximately 9 × 5 inches)
- Pastry brush
- Sharp knife or pizza cutter
- Clean kitchen towel
Step 1: Activate the Yeast
Start by warming the milk. It should feel warm but not hot. Aim for around 38–43°C (100–110°F). If the milk is too hot, it may kill the yeast.
Pour the warm milk into a large bowl and add sugar and yeast. Stir gently and let it sit for about 5–10 minutes.
The mixture should become foamy and slightly bubbly on top. That foam indicates the yeast is active.
If you are using instant yeast, technically you can skip this activation step, but doing it helps confirm your yeast is working properly.
Step 2: Prepare the Dough
Add the following ingredients to the yeast mixture:
- Sourdough discard
- Egg
- Melted butter
- Salt
Mix until everything is combined.
Gradually add flour, one cup at a time, stirring continuously.
Once the dough becomes too thick to stir, move it to a lightly floured surface and begin kneading.
Knead for approximately 8–10 minutes.
The dough should become:
- Soft
- Smooth
- Slightly tacky
- Elastic
Avoid adding too much flour. Pull-apart bread stays soft because the dough remains moderately hydrated.
If the dough sticks heavily to your hands, add flour one tablespoon at a time.
To test readiness, gently stretch a small piece of dough. It should stretch thinly without tearing immediately.
Step 3: First Rise
Shape the dough into a ball.
Lightly grease a bowl and place the dough inside. Turn it once so the surface is lightly coated.
Cover with a clean towel or plastic wrap.
Allow the dough to rise in a warm place for approximately 60–90 minutes.
The dough should roughly double in size.
Rise times vary depending on room temperature. A warmer kitchen speeds up fermentation, while a cooler room may require additional time.
Step 4: Make the Garlic Butter Mixture
While the dough rises, prepare the filling.
Combine:
- Softened butter
- Minced garlic
- Parsley
- Chives
- Oregano
- Salt
- Pepper
Mix thoroughly with a spoon until evenly blended.
The butter should be soft enough to spread easily but not melted.
If adding cheese, keep it nearby for assembly.
Step 5: Shape the Pull-Apart Bread
Once the dough has doubled, gently press it down to release excess air.
Transfer it to a lightly floured surface.
Roll it into a rectangle approximately:
30 × 45 cm (12 × 18 inches)
Try to maintain even thickness across the dough.
Spread the garlic butter mixture evenly over the entire surface.
If using cheese, sprinkle mozzarella and parmesan evenly across the top.
Using a pizza cutter or sharp knife, cut the dough into equal squares.
Squares around 7–8 cm (3 inches) work well.
Stack several squares on top of each other.
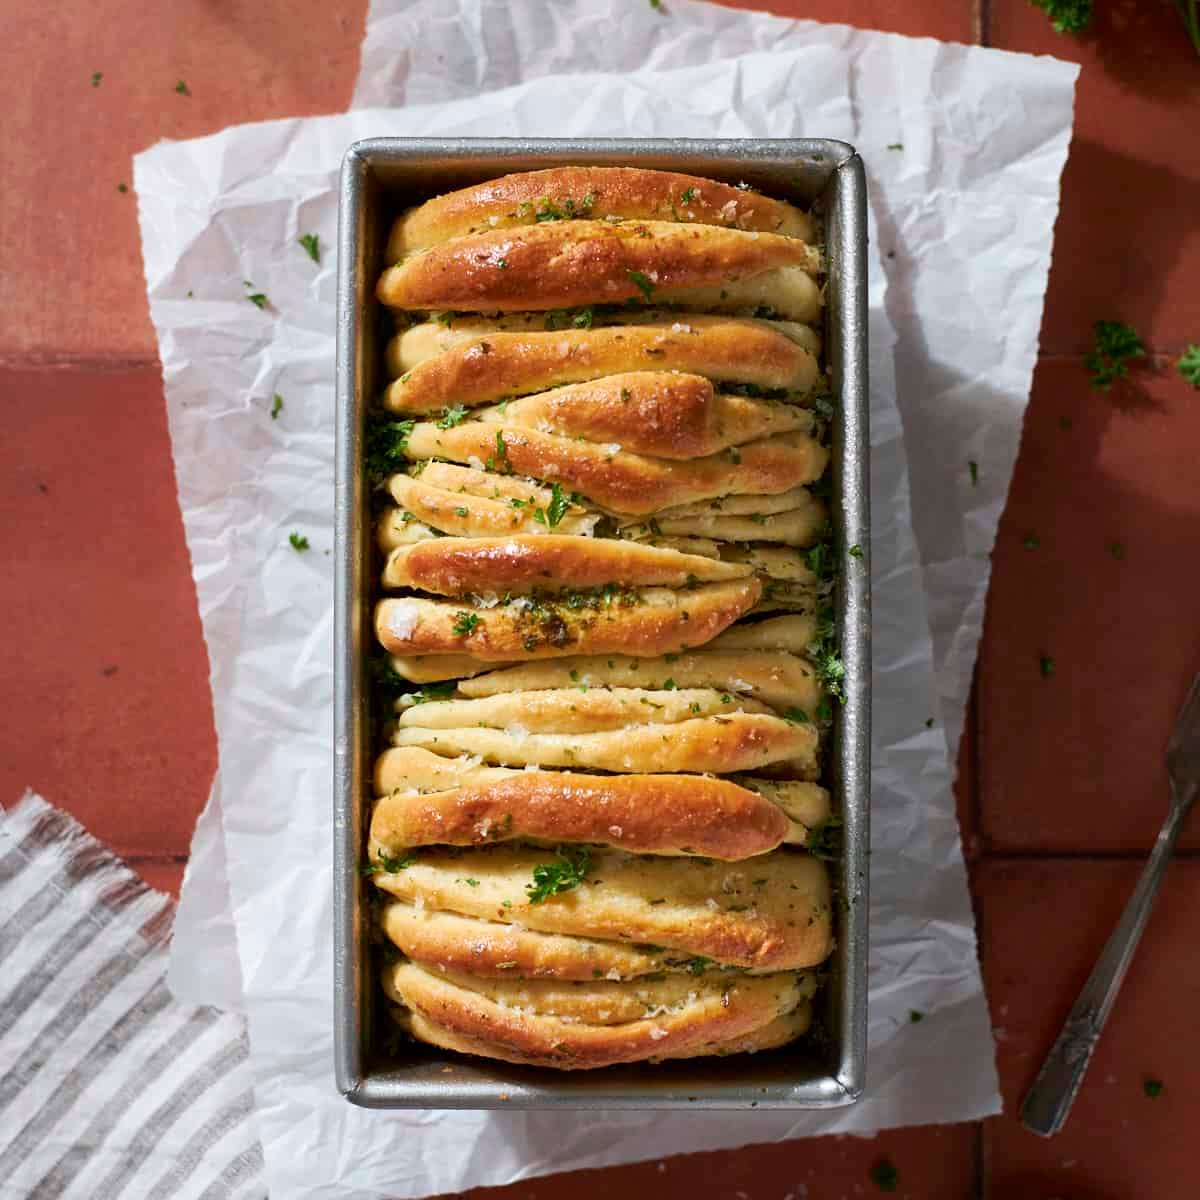
Now place the stacked sections vertically into a greased loaf pan.
Do not pack them too tightly. Leave small spaces because the dough will expand during the second rise.
The stacked appearance may look messy at this stage, but it becomes beautifully layered while baking.
Step 6: Second Rise
Cover the loaf pan loosely.
Allow the dough to rise again for approximately 30–45 minutes.
The dough should become puffier and nearly reach the top of the pan.
Meanwhile, preheat the oven to 180°C (350°F).
Step 7: Bake the Bread
Place the loaf into the center of the oven.
Bake for 35–40 minutes.
Check the loaf after approximately 25 minutes.
If the top begins browning too quickly, loosely cover it with aluminum foil.
The bread is done when:
- The top becomes deep golden brown
- Layers have expanded noticeably
- Internal temperature reaches approximately 88–93°C (190–200°F)
The kitchen should smell strongly of roasted garlic and butter at this stage.
Step 8: Finish and Serve
Remove the loaf from the oven.
Brush the top immediately with melted butter.
Sprinkle with extra parsley and parmesan if desired.
Allow the bread to cool for approximately 10–15 minutes before serving.
Pull apart the layers gently and serve warm.
Serving Ideas
Sourdough discard pull-apart garlic bread pairs beautifully with many meals.
Try serving it alongside:
- Tomato soup
- Creamy pasta dishes
- Grilled chicken
- Roasted vegetables
- Lasagna
- Stews
- Barbecue meals
It can also work as an appetizer with dipping sauces such as:
- Marinara sauce
- Garlic aioli
- Ranch dressing
- Cheese sauce
Storage Instructions
Store leftovers in an airtight container at room temperature for up to 2 days.
For longer storage, refrigerate for up to 5 days.
To reheat:
Wrap the bread loosely in foil and warm at 170°C (340°F) for approximately 10 minutes.
Microwaving works, but oven reheating keeps the exterior from becoming soggy.
Freezing Instructions
You can freeze the baked loaf or freeze it before baking.
For baked bread:
- Cool completely.
- Wrap tightly in plastic wrap and foil.
- Freeze for up to 2 months.
For unbaked dough:
- Assemble in the loaf pan.
- Freeze before the second rise.
- Thaw overnight in the refrigerator.
- Allow to rise before baking.
Tips for Success
Fresh garlic provides stronger flavor than garlic powder.
Do not overload the dough with extra flour because dry dough creates dense bread.
Soft butter spreads more evenly than melted butter during assembly.
If your kitchen is cold, place the covered dough inside an oven with only the oven light turned on.
Cheese is optional, but mozzarella creates delicious stretchy layers.
Final Thoughts
Sourdough discard pull-apart garlic bread transforms extra starter into something deeply comforting and practical. Every layer carries garlic butter and herbs, while the sourdough discard contributes a gentle tang that makes the flavor more complex than ordinary garlic bread. The loaf looks impressive enough for gatherings but remains simple enough for a weekend baking project.
The best part of this recipe is the experience of serving it. Rather than slicing with a knife, everyone simply pulls apart warm pieces from the loaf, creating a more relaxed and shared style of eating that often disappears from the table faster than expected.
