
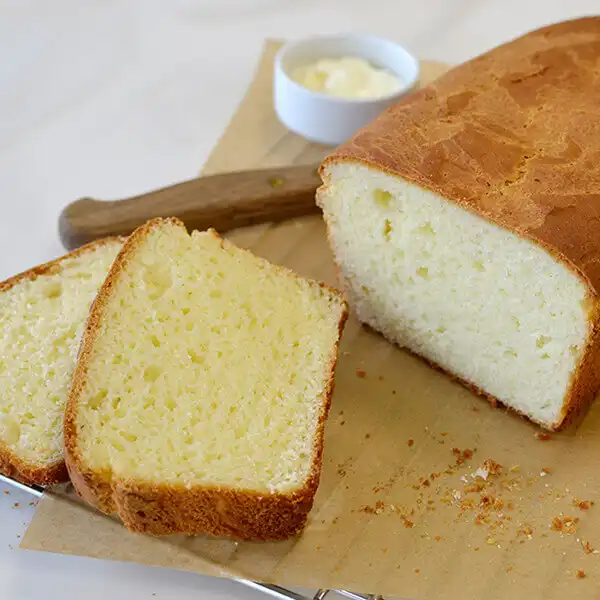
If you’ve ever struggled to find a gluten-free loaf that tastes as good as traditional wheat bread, you’re not alone. Many store-bought gluten-free breads are dry, crumbly, dense, or filled with preservatives. The good news is that making your own gluten-free sandwich bread at home is surprisingly simple and incredibly rewarding. With the right blend of flours, proper hydration, and a few baking techniques, you can create a loaf that is soft, fluffy, slices beautifully, and stays fresh for days.
This recipe is designed specifically for sandwiches. The bread has a tender crumb, a light texture, and enough structure to hold everything from peanut butter and jelly to deli meats and grilled cheese. Whether you’re following a gluten-free diet because of celiac disease, gluten sensitivity, or personal preference, this homemade bread will quickly become a kitchen favorite.
Why You’ll Love This Recipe
This gluten-free sandwich bread offers everything you want in homemade bread:
- Soft and fluffy texture
- Easy to slice
- Doesn’t crumble apart
- Mild flavor that works with sweet or savory fillings
- Freezer-friendly
- Dairy-free option available
- Beginner-friendly recipe
Unlike traditional bread, gluten-free dough behaves more like a thick batter than a kneadable dough. There’s no need for lengthy kneading sessions, making the process much easier.
Ingredients
Dry Ingredients
- 2 cups (280g) gluten-free all-purpose flour blend (with xanthan gum or add separately)
- 1 cup (120g) tapioca starch
- ½ cup (60g) potato starch
- 2 tablespoons sugar or honey
- 2 teaspoons instant yeast
- 1½ teaspoons salt
- 1 teaspoon xanthan gum (omit if your flour blend already contains it)
Wet Ingredients
- 2 large eggs, room temperature
- 1½ cups warm milk (about 110°F/43°C)
- ¼ cup vegetable oil or melted butter
- 1 teaspoon apple cider vinegar
Equipment
- 9×5-inch loaf pan
- Stand mixer or hand mixer
- Mixing bowls
- Measuring cups and spoons
- Cooling rack
Step 1: Prepare the Pan
Grease your loaf pan thoroughly with butter or non-stick cooking spray. You may also line it with parchment paper for easier removal.
Preheat your oven to 375°F (190°C).
Step 2: Mix the Dry Ingredients
In a large mixing bowl combine:
- Gluten-free flour
- Tapioca starch
- Potato starch
- Sugar
- Salt
- Instant yeast
- Xanthan gum (if needed)
Whisk well so everything is evenly distributed.
Step 3: Mix the Wet Ingredients
In another bowl whisk together:
- Eggs
- Warm milk
- Oil
- Apple cider vinegar
The warm milk helps activate the yeast while the vinegar improves the bread’s texture.
Step 4: Make the Dough
Pour the wet ingredients into the dry ingredients.
Mix using a stand mixer on medium speed for about 5 minutes.
Unlike wheat bread, gluten-free dough looks more like thick cake batter. This is completely normal.
Do not add excessive flour.
Step 5: Fill the Pan
Transfer the dough into the prepared loaf pan.
Smooth the top using a wet spatula.
If desired, brush lightly with oil for a softer crust.
Step 6: Let It Rise
Cover the pan loosely with plastic wrap or a clean towel.
Allow it to rise for 30–45 minutes in a warm place.
The dough should rise to just above the top edge of the pan.
Do not overproof, as gluten-free dough can collapse if it rises too much.
Step 7: Bake
Bake for 45–55 minutes.
The loaf should become golden brown.
An instant-read thermometer inserted into the center should read about 205°F (96°C).
If the top browns too quickly, loosely cover it with foil during the last 15 minutes.
Step 8: Cool Completely
Remove the loaf from the oven.
Allow it to cool in the pan for 10 minutes.
Transfer it to a cooling rack.
Wait until completely cool before slicing.
This is important because gluten-free bread continues setting as it cools.
Storage
Store the bread in an airtight container at room temperature for up to 3 days.
For longer storage:
- Refrigerate for up to one week.
- Freeze sliced bread for up to three months.
Toast frozen slices directly without thawing.
Tips for Success
Use a Good Flour Blend
Different gluten-free flour blends absorb moisture differently.
Choose one specifically designed for bread baking.
Measure Carefully
Too much flour can create dense bread.
For best results, weigh ingredients using a kitchen scale.
Don’t Skip Xanthan Gum
Xanthan gum replaces some of gluten’s elasticity.
Without it, the loaf may crumble.
Warm Ingredients
Room-temperature eggs and warm milk help yeast activity.
Cold ingredients can slow rising.
Mix Thoroughly
Gluten-free dough benefits from extended mixing because hydration is more important than gluten development.
Mix for at least five minutes.
Optional Add-Ins
Customize your loaf with ingredients like:
- Sunflower seeds
- Sesame seeds
- Flaxseed meal
- Chia seeds
- Oats (certified gluten-free)
- Fresh herbs
- Garlic powder
- Italian seasoning
- Shredded cheese
Mix add-ins into the batter before transferring it to the loaf pan.
Dairy-Free Version
Replace milk with:
- Almond milk
- Oat milk (certified gluten-free)
- Soy milk
- Rice milk
Use vegetable oil instead of butter.
Egg-Free Version
Replace each egg with one of the following:
- Flax egg
- Chia egg
- Commercial egg replacer
Keep in mind the bread may be slightly denser.
Serving Ideas
This bread is incredibly versatile. Try it for:
- Turkey sandwiches
- Ham and cheese
- Grilled cheese
- Peanut butter and jelly
- Tuna salad
- Egg salad
- Avocado toast
- French toast
- Garlic bread
- Breakfast sandwiches
Its soft texture also makes it ideal for school lunches and picnic sandwiches.
Common Problems and Solutions
Bread Is Too Dense
Possible causes:
- Too much flour
- Not enough rising time
- Expired yeast
- Oven temperature too low
Bread Collapsed
This usually happens because:
- Dough overproofed
- Too much liquid
- Oven door opened too early
Bread Is Dry
Try:
- Adding an extra tablespoon of oil
- Baking for less time
- Measuring flour accurately
- Storing in an airtight container
Bread Crumbles
Possible reasons include:
- Not enough xanthan gum
- Slicing while still warm
- Using an unbalanced flour blend
Nutrition (Approximate Per Slice)
Makes about 12 slices.
Per slice:
- Calories: 180
- Protein: 4g
- Carbohydrates: 31g
- Fat: 5g
- Fiber: 2g
- Sugar: 3g
Values will vary depending on the flour blend and ingredients used.
Final Thoughts
Homemade gluten-free sandwich bread is a wonderful alternative to expensive store-bought loaves. With its soft crumb, sturdy structure, and mild flavor, this recipe is perfect for everyday sandwiches, toast, and even French toast. While gluten-free baking may seem intimidating at first, following the correct ratios of flour, starches, liquid, and binders makes all the difference. Once you’ve baked this loaf a few times, you’ll likely find it becomes a regular part of your weekly meal prep.
The biggest advantages of making your own bread are freshness, control over ingredients, and the ability to customize flavors and textures to suit your preferences. Whether you’re preparing lunches for the week or serving warm slices with butter alongside dinner, this gluten-free sandwich bread delivers reliable results with a delicious homemade taste. With proper storage, freezing, and reheating, you can always have a wholesome loaf ready whenever you need it. Enjoy baking and savor every soft, flavorful slice.
