
No-Bake Protein Balls Recipe (Complete Guide)
Introduction
No-bake protein balls are one of the easiest, healthiest, and most convenient snacks you can prepare at home. They require no oven, take only a few minutes to make, and are packed with protein, healthy fats, fiber, and natural sweetness. Whether you’re looking for a post-workout snack, a quick breakfast on busy mornings, an afternoon energy boost, or a healthier alternative to sugary treats, these protein balls are an excellent choice.
Unlike many store-bought protein snacks that contain preservatives, artificial flavors, and excess sugar, homemade protein balls allow you to control every ingredient. You can customize the flavor, sweetness, and nutritional value according to your preferences and dietary needs.
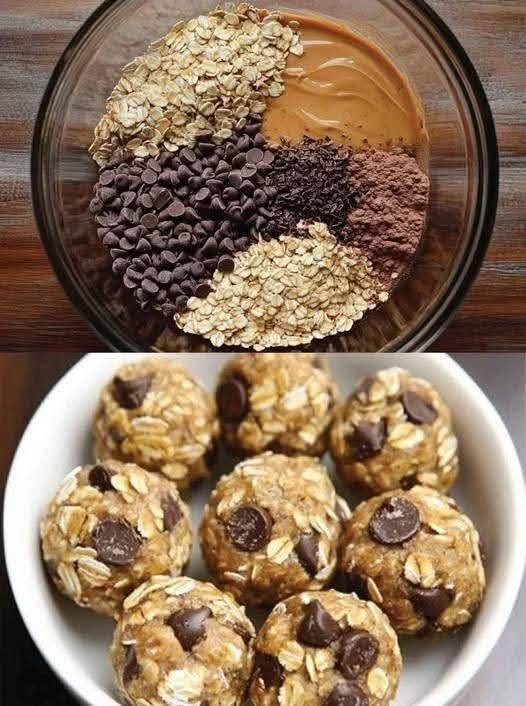
This recipe combines rolled oats, protein powder, peanut butter, honey, chia seeds, and chocolate chips to create soft, chewy, and satisfying bites. The ingredients are simple, affordable, and widely available. Best of all, these protein balls can be stored in the refrigerator or freezer, making meal prep easy for the entire week.
Why You’ll Love This Recipe
There are many reasons why no-bake protein balls have become a favorite healthy snack:
- No baking required.
- Ready in about 15 minutes.
- High in protein.
- Rich in dietary fiber.
- Naturally sweetened.
- Easy to customize.
- Perfect for meal prep.
- Kid-friendly.
- Great before or after exercise.
- Easy to transport for work, school, or travel.
Ingredients
Dry Ingredients
- 2 cups rolled oats
- 1 cup vanilla or chocolate protein powder
- 2 tablespoons chia seeds
- 2 tablespoons ground flaxseed
- ½ teaspoon cinnamon
- ¼ teaspoon sea salt
Wet Ingredients
- 1 cup natural peanut butter
- ⅓ cup honey
- 1 teaspoon vanilla extract
- 2 tablespoons milk (dairy or plant-based), if needed
Optional Mix-ins
- ¼ cup mini dark chocolate chips
- 2 tablespoons shredded coconut
- 2 tablespoons chopped almonds
- 2 tablespoons chopped walnuts
- 2 tablespoons pumpkin seeds
- 2 tablespoons sunflower seeds
- Dried cranberries or raisins
Equipment Needed
- Large mixing bowl
- Measuring cups
- Measuring spoons
- Silicone spatula or wooden spoon
- Cookie scoop (optional)
- Baking tray or plate
- Parchment paper
- Airtight storage container
Step-by-Step Instructions
Step 1: Combine the Dry Ingredients
In a large mixing bowl, add:
- Rolled oats
- Protein powder
- Chia seeds
- Ground flaxseed
- Cinnamon
- Salt
Mix thoroughly until all ingredients are evenly distributed.
This step ensures every protein ball has a balanced flavor and texture.
Step 2: Mix the Wet Ingredients
In another bowl, combine:
- Peanut butter
- Honey
- Vanilla extract
Stir until smooth and creamy.
If your peanut butter is very thick, microwave it for about 15–20 seconds so it mixes more easily.
Step 3: Combine Everything
Pour the wet mixture into the dry ingredients.
Using a sturdy spoon or spatula, stir until everything begins to stick together.
If the mixture feels dry, add milk one tablespoon at a time until it reaches a soft dough consistency.
If it feels sticky, add a few extra tablespoons of oats.
Step 4: Add Mix-ins
Fold in:
- Chocolate chips
- Coconut
- Nuts
- Seeds
- Dried fruit
Mix until evenly incorporated.
Step 5: Chill the Dough
Cover the bowl and refrigerate for about 20–30 minutes.
Chilling helps firm the mixture, making it easier to roll into balls.
Step 6: Roll into Balls
Using your hands or a cookie scoop, portion the mixture into approximately 1-inch balls.
Roll each one until smooth.
Place them on a parchment-lined tray.
Step 7: Refrigerate Again
Place the tray into the refrigerator for another 15 minutes.
Once firm, transfer the protein balls to an airtight container.
Tips for Success
- Use natural peanut butter without added oils if possible.
- Do not overmix after adding chocolate chips.
- Chill the dough before rolling.
- Wet your hands slightly to prevent sticking.
- Taste the mixture before rolling and adjust sweetness if desired.
- Use fresh protein powder for the best flavor.
Flavor Variations
Chocolate Peanut Butter
Use chocolate protein powder and add:
- 2 tablespoons cocoa powder
- Extra chocolate chips
Coconut Almond
Replace peanut butter with almond butter.
Add:
- Extra shredded coconut
- Chopped almonds
Cookies and Cream
Use cookies-and-cream protein powder.
Mix in crushed chocolate sandwich cookies.
Lemon
Add:
- Lemon zest
- Vanilla protein powder
- White chocolate chips
Mocha
Mix in:
- 1 teaspoon instant espresso powder
- Chocolate protein powder
Pumpkin Spice
Add:
- Pumpkin puree
- Pumpkin spice
- Pecans
Cinnamon Roll
Increase cinnamon.
Add a little maple syrup and chopped pecans.
Storage Instructions
Refrigerator
Store in an airtight container for up to 1 week.
Freezer
Freeze for up to 3 months.
Separate layers with parchment paper.
Allow frozen protein balls to thaw for 10–15 minutes before eating.
Nutritional Benefits
Protein balls contain a balanced combination of nutrients.
Protein
Protein supports muscle repair, growth, and helps keep you feeling full.
Fiber
Oats, flaxseed, and chia seeds provide fiber that supports digestion and promotes longer-lasting fullness.
Healthy Fats
Peanut butter and seeds provide heart-healthy unsaturated fats.
Natural Sweeteners
Honey offers sweetness while also helping bind the ingredients together.
Approximate Nutrition (Per Ball)
(Makes about 20 balls)
- Calories: 140
- Protein: 8 g
- Carbohydrates: 13 g
- Fiber: 3 g
- Sugar: 5 g
- Fat: 7 g
- Saturated Fat: 1.5 g
- Sodium: 70 mg
Nutrition values may vary depending on the specific ingredients used.
Serving Suggestions
Enjoy these protein balls:
- After a workout
- Before exercise
- As a quick breakfast
- With coffee
- With tea
- In lunchboxes
- As a healthy dessert
- During road trips
- On hiking adventures
- As an afternoon snack
They also pair well with:
- Greek yogurt
- Fresh berries
- Banana slices
- Apple slices
- Smoothies
Recipe Customization
You can easily adapt this recipe to suit different dietary needs:
Gluten-Free
Use certified gluten-free rolled oats.
Dairy-Free
Choose a dairy-free protein powder and plant-based milk.
Vegan
Replace honey with maple syrup or agave nectar and use a vegan protein powder.
Nut-Free
Substitute peanut butter with sunflower seed butter or tahini.
Low-Sugar
Use unsweetened protein powder and reduce or replace the honey with a sugar-free liquid sweetener designed for cooking, adjusting the texture as needed.
Common Mistakes to Avoid
- Using too much liquid, which makes the mixture difficult to roll.
- Skipping the chilling step, resulting in soft, sticky protein balls.
- Overloading the mixture with add-ins, which can prevent it from holding together.
- Using quick oats instead of rolled oats if you prefer a chewier texture.
- Not tasting the mixture before shaping, which can make it harder to adjust sweetness or spice later.
Frequently Asked Questions
Can I use whey protein?
Yes. Whey protein works well, though different brands absorb moisture differently, so you may need to adjust the amount of milk or oats.
Can I make these without protein powder?
Yes. Replace the protein powder with finely ground oats or almond flour, although the protein content will be lower.
Why won’t my protein balls stick together?
The mixture is likely too dry. Add a small amount of milk, peanut butter, or honey until it holds its shape.
Can I use crunchy peanut butter?
Absolutely. Crunchy peanut butter adds extra texture and a pleasant nutty crunch.
Can children eat these?
Yes, provided there are no ingredient allergies. They make a nutritious snack for school or after activities.
Can I freeze them?
Yes. Freeze in an airtight container for up to three months. Thaw in the refrigerator or at room temperature before serving.
Final Thoughts
No-bake protein balls are a simple, nutritious, and versatile snack that fits into a wide range of lifestyles. With just a handful of wholesome ingredients and no baking required, you can prepare a batch in minutes and enjoy convenient, protein-rich snacks throughout the week. Their combination of oats, protein powder, nut butter, seeds, and optional mix-ins delivers satisfying flavor, balanced nutrition, and endless opportunities for customization.
Whether you prefer classic peanut butter, rich chocolate, bright lemon, or seasonal pumpkin spice, this recipe can easily be adapted to suit your tastes. Keep a batch in the refrigerator for everyday snacking or freeze extras for longer storage, and you’ll always have a delicious homemade option ready whenever hunger strikes.
